


If you've had a helix or tragus piercing that never seemed to heal, the backing might be why. Cartilage piercings are notoriously slow, and most people blame their own biology — but the real culprit is often a butterfly clutch catching on a pillowcase at 2am and rotating the jewelry just enough to break new tissue.
Flat back earrings fix that. The disc back sits flush against the skin with nothing sticking out to catch or snag. Professional piercing studios switched to flat backs as their standard of care years ago. If your piercer reaches for a gun and a butterfly-back stud, walk out. Here's what you actually need to know.
Why Cartilage Piercings Need Flat Backs
Cartilage is fundamentally different from earlobe tissue. It's avascular — it doesn't have its own blood supply — so it heals entirely through diffusion from surrounding tissue. That makes it much more sensitive to disruption. Any repeated trauma, even tiny, resets the healing clock.
Butterfly backs create four problems in cartilage that they don't in lobes:
1. They snag. The two wire wings of a butterfly back catch on hair strands, sweater fabric, and pillowcases constantly. Every snag tugs the jewelry and micro-tears healing tissue. Lobes tolerate this because they heal in 6–8 weeks and the tissue is forgiving. Cartilage does not forgive it.
2. They apply uneven pressure. A butterfly back contacts the skin at two small points. A flat disc distributes contact across its entire surface. In healing cartilage, pressure points cause localized irritation — the bumps you see behind a piercing are often pressure-bump keloids from an uneven backing.
3. They let the jewelry rotate. Butterfly clutches have some play, especially once worn. A rotating post in a healing cartilage piercing is the same as picking a scab every day. Flat backs — especially threadless designs — minimize rotational movement because the post and back are a single fitted unit.
4. They're too short for initial piercings. Butterfly-back studs from mall kiosks are usually 4–5mm posts. A fresh cartilage piercing swells and needs at least 8mm of post to avoid embedding. A flat back post is easy to specify at the right length; butterfly-back studs almost never give you that option.
The Association of Professional Piercers (APP) prohibits butterfly-back jewelry for initial piercings for exactly these reasons. It's not a trend — it's a standard of care.
Cartilage Piercing Types That Use Flat Backs
Every standard cartilage piercing uses a flat back post. The gauge and post length vary by placement. Here's a full breakdown of the eight most common cartilage piercings:
| Placement | Standard Gauge | Post Length | Healing Time | Notes |
|---|---|---|---|---|
| Helix | 16g (1.2mm) | 6–8mm | 6–12 months | Most popular cartilage piercing; outer rim of ear |
| Forward helix | 16g (1.2mm) | 6–8mm | 6–9 months | Trending; inner rim near face — trickier placement |
| Tragus | 16g (1.2mm) | 6–8mm | 6–12 months | Thick tissue; flat back is mandatory, not optional |
| Anti-tragus | 16g (1.2mm) | 6–8mm | 8–16 months | Opposite the tragus; less common, slower to heal |
| Conch | 16g (1.2mm) | 6–10mm | 6–12 months | Inner or outer bowl; may need longer post initially |
| Daith | 16g (1.2mm) | N/A (curved) | 6–12 months | Usually starts as curved barbell, not labret |
| Rook | 16g (1.2mm) | N/A (curved) | 6–18 months | Anti-helix fold; often curved barbell but flat back works |
| Snug | 16g (1.2mm) | N/A (curved) | 12–24 months | Hardest cartilage to heal; inner rim below anti-helix |
Notice that 16g is the standard across every placement. This matters when you're buying replacement jewelry — a 18g post won't fit a 16g piercing securely. Always confirm your gauge before ordering.
How to Choose Flat Back Cartilage Earrings
The most important decision you make isn't the top design — it's the material. Material determines whether a healing piercing tolerates the jewelry or fights it. Here's how the main options stack up:
| Material | Nickel-Free? | For Fresh Piercings? | For Healed Piercings? | Verdict |
|---|---|---|---|---|
| Implant-grade titanium (ASTM F136) | Yes — 100% | Best choice | Excellent | Gold standard; anodized for color; lightweight |
| Implant-grade steel (ASTM F138) | Yes (low nickel, bound) | Good | Excellent | Solid option; slightly heavier than titanium |
| 925 sterling silver | Usually (7.5% copper) | Not recommended | Good for healed piercings | Can irritate healing tissue; fine once fully healed |
| 18K gold-plated sterling | Yes (if base is sterling) | Not ideal | Good | Aesthetic appeal; stick to implant-grade for healing |
| Mystery alloy / "surgical steel" (unspecified) | Unknown | Avoid | Avoid | No ASTM spec = no guarantee; skip entirely |
If your piercing is fresh, go implant-grade titanium. It's the most biocompatible metal available for body jewelry — no nickel leaching, no coating to flake, and it's the lightest option, which matters in cartilage where even a heavy earring creates drag. The American Academy of Dermatology identifies nickel as the most common contact allergen — titanium eliminates that risk completely.
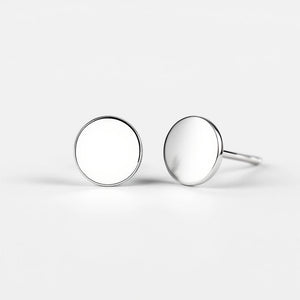
Once your piercing is fully healed, 925 sterling silver opens up as an option. Our flat-back stud earrings are 925 sterling silver — designed for healed piercings where the priority shifts from biocompatibility to everyday wearability and aesthetics.
Gauge Guide for Cartilage Flat Backs
Gauge is the thickness of the post. It's measured on the AWG scale, where a higher number means a thinner post — the opposite of what you'd expect. Getting the gauge wrong means the earring either won't fit or will wobble in the hole.
| Gauge | Diameter | Typical Placements | Who It's For |
|---|---|---|---|
| 14g | 1.6mm | Conch (some), industrial | Specific placements — confirm with your piercer |
| 16g | 1.2mm | Helix, tragus, forward helix, conch, anti-tragus | Standard cartilage gauge — most common choice |
| 18g | 1.0mm | Earlobe (standard), some nostril | Standard lobe gauge — too thin for most cartilage |
| 20g | 0.8mm | Nostril, some lobe | Very thin — not used in cartilage flat backs |
If you're not sure what gauge your piercing is, check the jewelry already in it — the gauge is usually stamped on the piece or included in your piercer's aftercare paperwork. When in doubt, go back to your piercer and ask. Guessing wrong is the most common reason a new flat back earring won't seat properly.
Post Length for Cartilage: Fresh vs. Healed
Post length is the distance from the flat disc back to the front of the top. It's measured in millimeters and matters a lot more in cartilage than in lobes.
For fresh piercings: 8mm. A new cartilage piercing swells, sometimes significantly, in the first few weeks. An 8mm post gives the tissue room to swell without the jewelry embedding into the skin. If the post is too short and the disc starts pressing into swollen tissue, you have a serious problem — removal becomes difficult and scarring increases.
For healed piercings: 6mm. Once swelling is gone and the channel has formed, a 6mm post is the right fit. A longer post sticks out slightly on healed piercings and can catch more easily. Your piercer will typically switch you from an 8mm to a 6mm at your check-up once healing is confirmed.
Don't try to save money by buying one length for both stages. The difference between embedding and comfortable wear is 2mm. It's worth buying the right length for each phase.
Threadless vs. Internally Threaded for Cartilage
Both threadless (tension-fit) and internally threaded flat backs are used in cartilage. They have different strengths, and cartilage has specific demands that tip the balance:
| Feature | Threadless (Push-Pin / Tension) | Internally Threaded |
|---|---|---|
| How it works | Bent pin on top presses into hollow post — tension holds it | Top screws into post from outside; threads are inside the post |
| Tops interchangeable? | Yes — easy to swap styles | Yes — if threading matches |
| Security overnight? | Good — tension holds well with sleep movement | Excellent — screw doesn't back out |
| Rotation risk | Very low | Very low |
| Ease of insertion (solo) | Moderate — requires two hands at awkward angle | Moderate — same challenge |
| Best for cartilage? | Yes — preferred for fresh piercings | Yes — excellent for healed, worn daily |
| Price range | $15–50 (titanium, studio) | $15–50 (titanium, studio) |
Professional piercers typically favor threadless for initial piercings because there are no threads to scratch the piercing channel during insertion. Once the cartilage is healed, internally threaded pieces are excellent — the screw gives a slight extra degree of security that matters if you're active or sleep on that side.
Push-pin flat backs (a simpler push-fit design without the bent-pin tension system) are a third option — they're common in fashion jewelry like our sterling flat-back studs and work well in healed piercings. They're not recommended for fresh cartilage because the fit isn't as precise.
How to Insert a Flat Back in Cartilage
This is the part nobody warns you about: flat back earrings in cartilage are genuinely harder to put in solo than butterfly-back earrings. You're working at an awkward angle, the post is shorter than you're used to, and you can't see what you're doing. Here's the method that works.

- Wash your hands. Always. No exceptions with cartilage — introduce bacteria and you're setting healing back weeks.
- Separate the pieces. For threadless tops, gently pull the top away from the post. For internally threaded, unscrew the top. Set the back (post + disc) aside and hold the top in your dominant hand.
- Insert the post from behind. Hold the flat disc between your thumb and index finger, position the post at the back of your piercing, and push it through from behind toward the front. For helix piercings, you'll need to fold your ear forward slightly to access the back.
- Seat the top from the front. Once the post tip is visible at the front of the piercing, press the top onto it (for threadless, push firmly until you feel the tension pin engage — you'll feel a slight pop). For internally threaded, screw the top clockwise until snug — not tight, just finger-snug.
- Check the disc is flat. Run your finger behind the ear and confirm the disc is flush against the skin. If it's angled, the post isn't fully seated — back up and try again.
The learning curve is real. Most people need 4–5 tries before it feels natural. A magnifying mirror positioned behind you helps enormously. If you're struggling, ask your piercer to show you in person during your check-up appointment — it takes about 30 seconds to demonstrate and makes future changes much easier.
Caring for Cartilage Piercings
Cartilage aftercare is simpler than most people think — the main rule is to leave it alone as much as possible. Fussing with a cartilage piercing is worse than neglecting it.
The sterile saline routine: Spray sterile saline (0.9% sodium chloride, no additives) on the piercing twice a day. Don't rotate the jewelry. Don't use cotton balls — the fibers get caught. A saline spray in a can (like NeilMed Wound Wash) is the easiest delivery method. That's essentially the entire routine.
What to avoid:
- Alcohol and hydrogen peroxide — they kill healing cells, not just bacteria
- Rotating the jewelry — this is an old myth; rotation damages healing tissue
- Swimming in pools, hot tubs, or open water for the first 3 months
- Sleeping on the piercing side (use a travel pillow with a hole, or a donut-shaped travel pillow, to keep pressure off)
- Touching it with unwashed hands
- Changing jewelry before it's fully healed
Healing timeline: A helix typically takes 6–12 months to heal fully. A tragus is similar. A snug can take up to 2 years. "Healed" means no discharge, no tenderness, and the skin around the jewelry looks the same as the rest of your ear. A piercing that looks okay but still occasionally produces crust is still healing — wait before changing jewelry.
If you develop a piercing bump, don't panic. Bumps are usually irritation bumps (not keloids) caused by pressure, snagging, or a too-short post. The fix is usually to switch to a longer post and improve your aftercare routine — not to remove the jewelry.
Related Guides
Looking for more? These guides cover the rest of the flat back earring universe:
- Flat Back Earrings Guide: Everything You Need to Know — the full overview of all flat back types, how they work, and why piercers love them
- Best Flat Back Earrings in 2026 — a decision guide by material, use case, and budget (not a brand listicle)
- Flat Back Earrings for Sensitive Ears — why the backing matters as much as the metal for reactive ears
- Shop Sensitive Ear Earrings — our 925 sterling silver collection, designed for ears that react to mystery metals
Frequently Asked Questions
- Can I wear flat back earrings in my helix piercing?
- Yes — flat back earrings (also called labret studs) are actually the recommended style for helix piercings. They sit flush against the cartilage, don't snag on hair or clothing, and distribute pressure evenly across the skin. Professional piercers use flat backs exclusively for initial cartilage piercings.
- What gauge are cartilage flat back earrings?
- Standard cartilage piercings use 16g (1.2mm) posts. This is true for helix, forward helix, tragus, anti-tragus, and conch piercings. Earlobe piercings typically use 18g. Always match the gauge to your existing piercing — buying the wrong size means the earring won't fit properly.
- Why won't my cartilage piercing heal?
- The most common culprits are wrong jewelry (butterfly backs that snag, or a post that's too short), sleeping on the piercing, or touching it with unwashed hands. Cartilage heals through tissue diffusion rather than its own blood supply, so any repeated disruption resets the clock. Switching to a properly sized flat back and strict saline-only aftercare resolves most stubborn cases.
- How do I put a flat back earring in my cartilage by myself?
- Insert the post from behind the ear first, pushing it through toward the front. Then press or screw the top on from the front. For helix piercings, fold your ear forward gently to access the back. Use a magnifying mirror behind you. It takes a few tries to get comfortable with the motion — it's harder than a butterfly back but much better for your piercing.
- What size flat back do I need for cartilage?
- Get 16g gauge and 8mm post length for a fresh cartilage piercing (swelling needs the extra room). Once fully healed, switch to a 6mm post. The disc back diameter is usually 4–5mm — small enough to sit comfortably behind cartilage without creating pressure points.
- Are threadless or threaded flat backs better for cartilage?
- Threadless (tension-fit) flat backs are preferred for fresh cartilage piercings because there are no threads to scratch the healing channel during insertion or changes. For fully healed cartilage, both threadless and internally threaded work well — internally threaded gives a slightly more secure fit for active wear or sleeping.
- How long should I wait before changing my cartilage flat back?
- Wait until the piercing is fully healed — typically 6–12 months for helix and tragus, up to 2 years for snug piercings. Signs of full healing: no discharge, no tenderness to touch, and the skin around the jewelry looks identical to the surrounding skin. If you're unsure, visit your piercer for a check before changing jewelry.
- Can you wear flat back earrings in lobes?
- Yes — flat back earrings work in any lobe piercing too. You'd use an 18g post for standard lobe piercings and a 6mm post length for most earlobes. Many people who get a flat back for their cartilage prefer the look for their lobe as well because it's sleeker and more comfortable.
- Do flat backs fall out more than butterfly backs?
- No — threadless flat backs have a tension pin that holds securely, and internally threaded ones screw in. Both stay put through normal movement, sleep, and exercise. Butterfly backs are actually more prone to falling off because the wings can be bumped loose. A properly fitted flat back is more secure, not less.
- What does "labret stud" mean — is it the same as a flat back?
- Yes, labret stud and flat back earring refer to the same piece of jewelry. A labret stud has a flat disc on one end (the back) and a removable decorative top on the other. The name comes from lip piercings (the "labret" is the area below the lower lip), but the design is now used across all cartilage and lobe placements.
- Can I use a flat back earring for a tragus piercing?
- Yes — and it's the recommended style. The tragus is a thick piece of cartilage, which means jewelry that sticks out gets caught more easily. A 16g flat back labret stud with a 6–8mm post is the standard for tragus piercings. Your piercer will start you on 8mm for swelling room and switch you to 6mm at your check-up.
The Bottom Line on Flat Back Cartilage Earrings
Flat back earrings aren't a trend in the piercing world — they're the professional standard because they work better than every alternative. The disc back eliminates snagging, distributes pressure evenly, minimizes rotation, and can be ordered in the exact gauge and post length your cartilage needs. Butterfly backs were never designed for cartilage in the first place.
If you're starting a new cartilage piercing, go to an APP-member studio, specify implant-grade titanium in a 16g threadless flat back with an 8mm post, and commit to the sterile saline routine. If your piercing is healed and you're ready for a style upgrade, a quality 925 sterling silver flat back is an excellent everyday option. Our flat-back stud earrings are 925 sterling silver at $32, and the full sensitive ear earrings collection has styles that work for healed cartilage and lobe piercings alike.
Written by the AJLuxe team — specialists in personalized sterling silver jewelry. Last updated: June 2026. For more on piercing care and earring styles, see our best flat back earrings guide and flat back earrings for sensitive ears.
You Might Also Like

The piece they're describing → Boucles d'oreilles clous à dos plat — Puces hypoallergéniques en argent sterling pour dormir
Personalize Yours

